> ## Documentation Index
> Fetch the complete documentation index at: https://docs.beeble.ai/llms.txt
> Use this file to discover all available pages before exploring further.
# SDR to HDR
> Reconstruct 8-bit SDR footage into 16-bit HDR EXRs with SwitchHDR
SDR to HDR is available exclusively on **Beeble (Cloud app)**. It is not
available in Beeble Studio.
**SDR to HDR** is a professional reconstruction tool for filmmakers, colorists, and VFX artists, powered by our [**SwitchHDR**](https://beeble.ai/research/switchhdr) model. It turns standard 8-bit SDR footage into true 16-bit HDR masters built for production pipelines.
Unlike tone mapping, SwitchHDR rebuilds the detail SDR threw away. It recovers information behind blown windows and crushed blacks, while keeping well-exposed areas faithful to the source.
**Key features:**
* **True 16-bit EXR output** with a full ACES workflow (ACES2065-1, **AP0**)
* **Expanded depth and range** for smoother grading with less banding
* **Precise control** via highlight and shadow masks, with optional text prompts
* **Powered by SwitchHDR**, our foundational model trained specifically for accurate SDR-to-HDR reconstruction
***
## Quick start
Upload an image or a video (**1-240 frames**). For longer clips, trim before uploading.
Use **Highlight** and **Shadow** thresholds to define which regions the model reconstructs. The overlay and histogram show exactly which pixels are affected.
**Video:** Use **Change Frame** to verify the mask on a different frame.
Optionally describe the recovered highlights and shadows (or click
**Suggest**), pick **1080p** or **720p**, and generate. Set a fixed **Seed**
under **Advanced** for reproducible results.
Check the result with the **EV slider**, then download the outputs: the **EXR** sequence and the **HLG** `.mov`.
***
## Specs
| Item | Details |
| ---------------- | --------------------------------------------------------------- |
| **Resolution** | 1080p or 720p (short edge is scaled to the selected resolution) |
| **Aspect Ratio** | Always preserved |
| **Frame Rate** | Always preserved |
***
## Export
| File | What it is |
| ---------------------------------------- | ----------------------------------------------------------------------------------------------------------------------------- |
| `{name}_ACES2065-1.exr` / `.zip` | Finishing master EXR in **ACES2065-1 (AP0)**, **16-bit half-float**. Video jobs download as a numbered EXR sequence in a ZIP. |
| `{name}_HLG.mov` | For video jobs, a Rec.2020 / **HLG** QuickTime for playback and review. |
| `{name}_mask_highlight` / `_mask_shadow` | Reconstruction mattes (PNG for images, MP4 for video) for comp and selective grading. |
***
## Load in DaVinci Resolve & Nuke
Unzip `{name}_ACES2065-1.zip` and import the EXRs, then follow the setup below so they are read as ACES, not as Rec.709 / sRGB.
### 1. Frame rate (video jobs)
* Before importing, set **Project Settings → Master Settings → Timeline frame rate** to your source clip's rate.
* Already imported? Right-click the sequence → **Clip Attributes → Video Frame rate**.
### 2. Color space
Pick **one**. Combining both can cause a double transform.
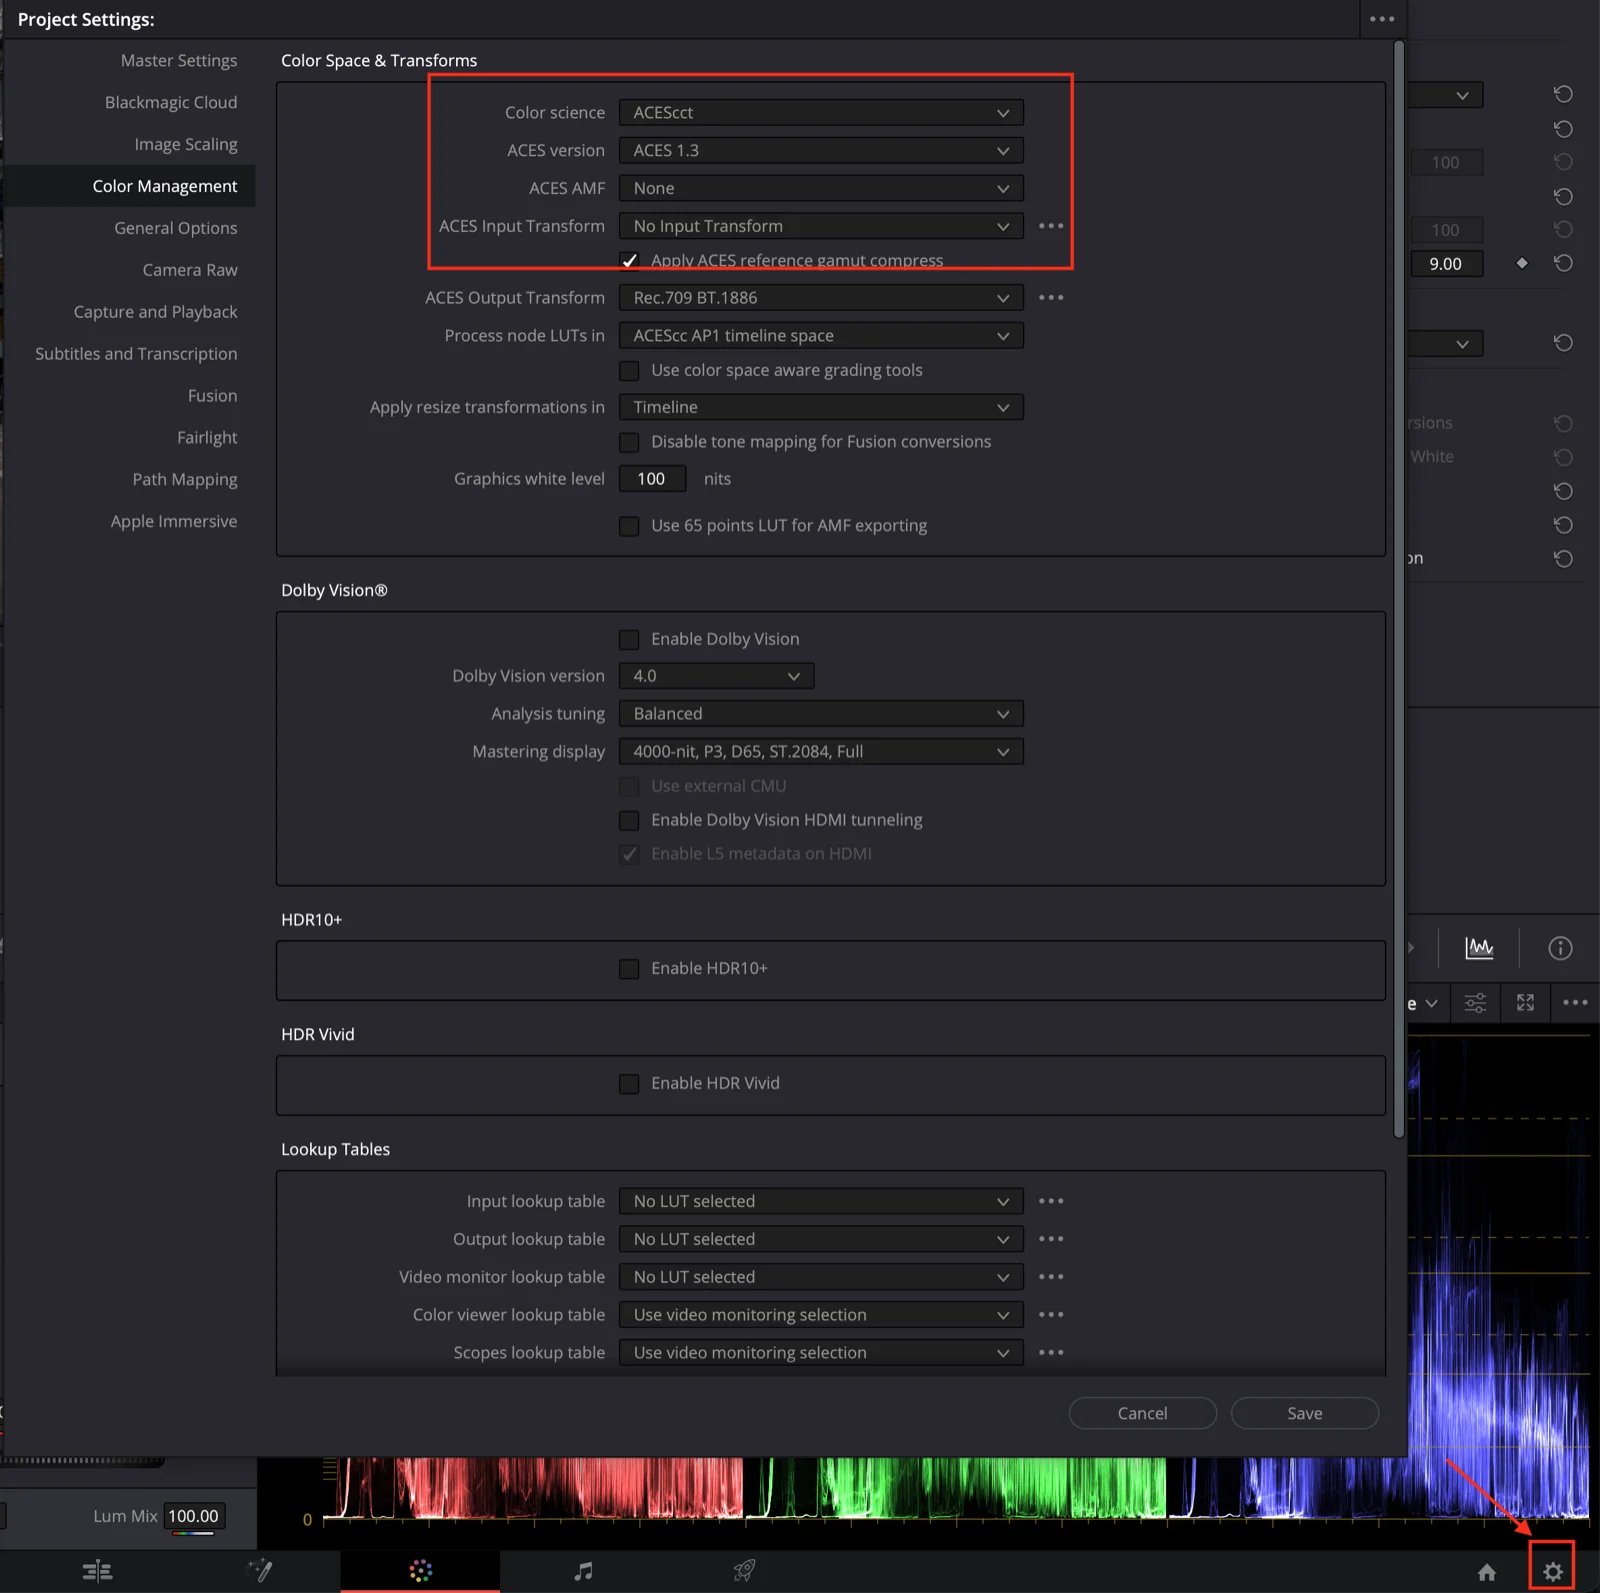
**Option A: Project-wide ACES**
1. **Project Settings → Color Management**: Color science **ACEScct**, ACES version **1.3**
2. Set the **Output / Display Transform** for your monitor (e.g. Rec.709)
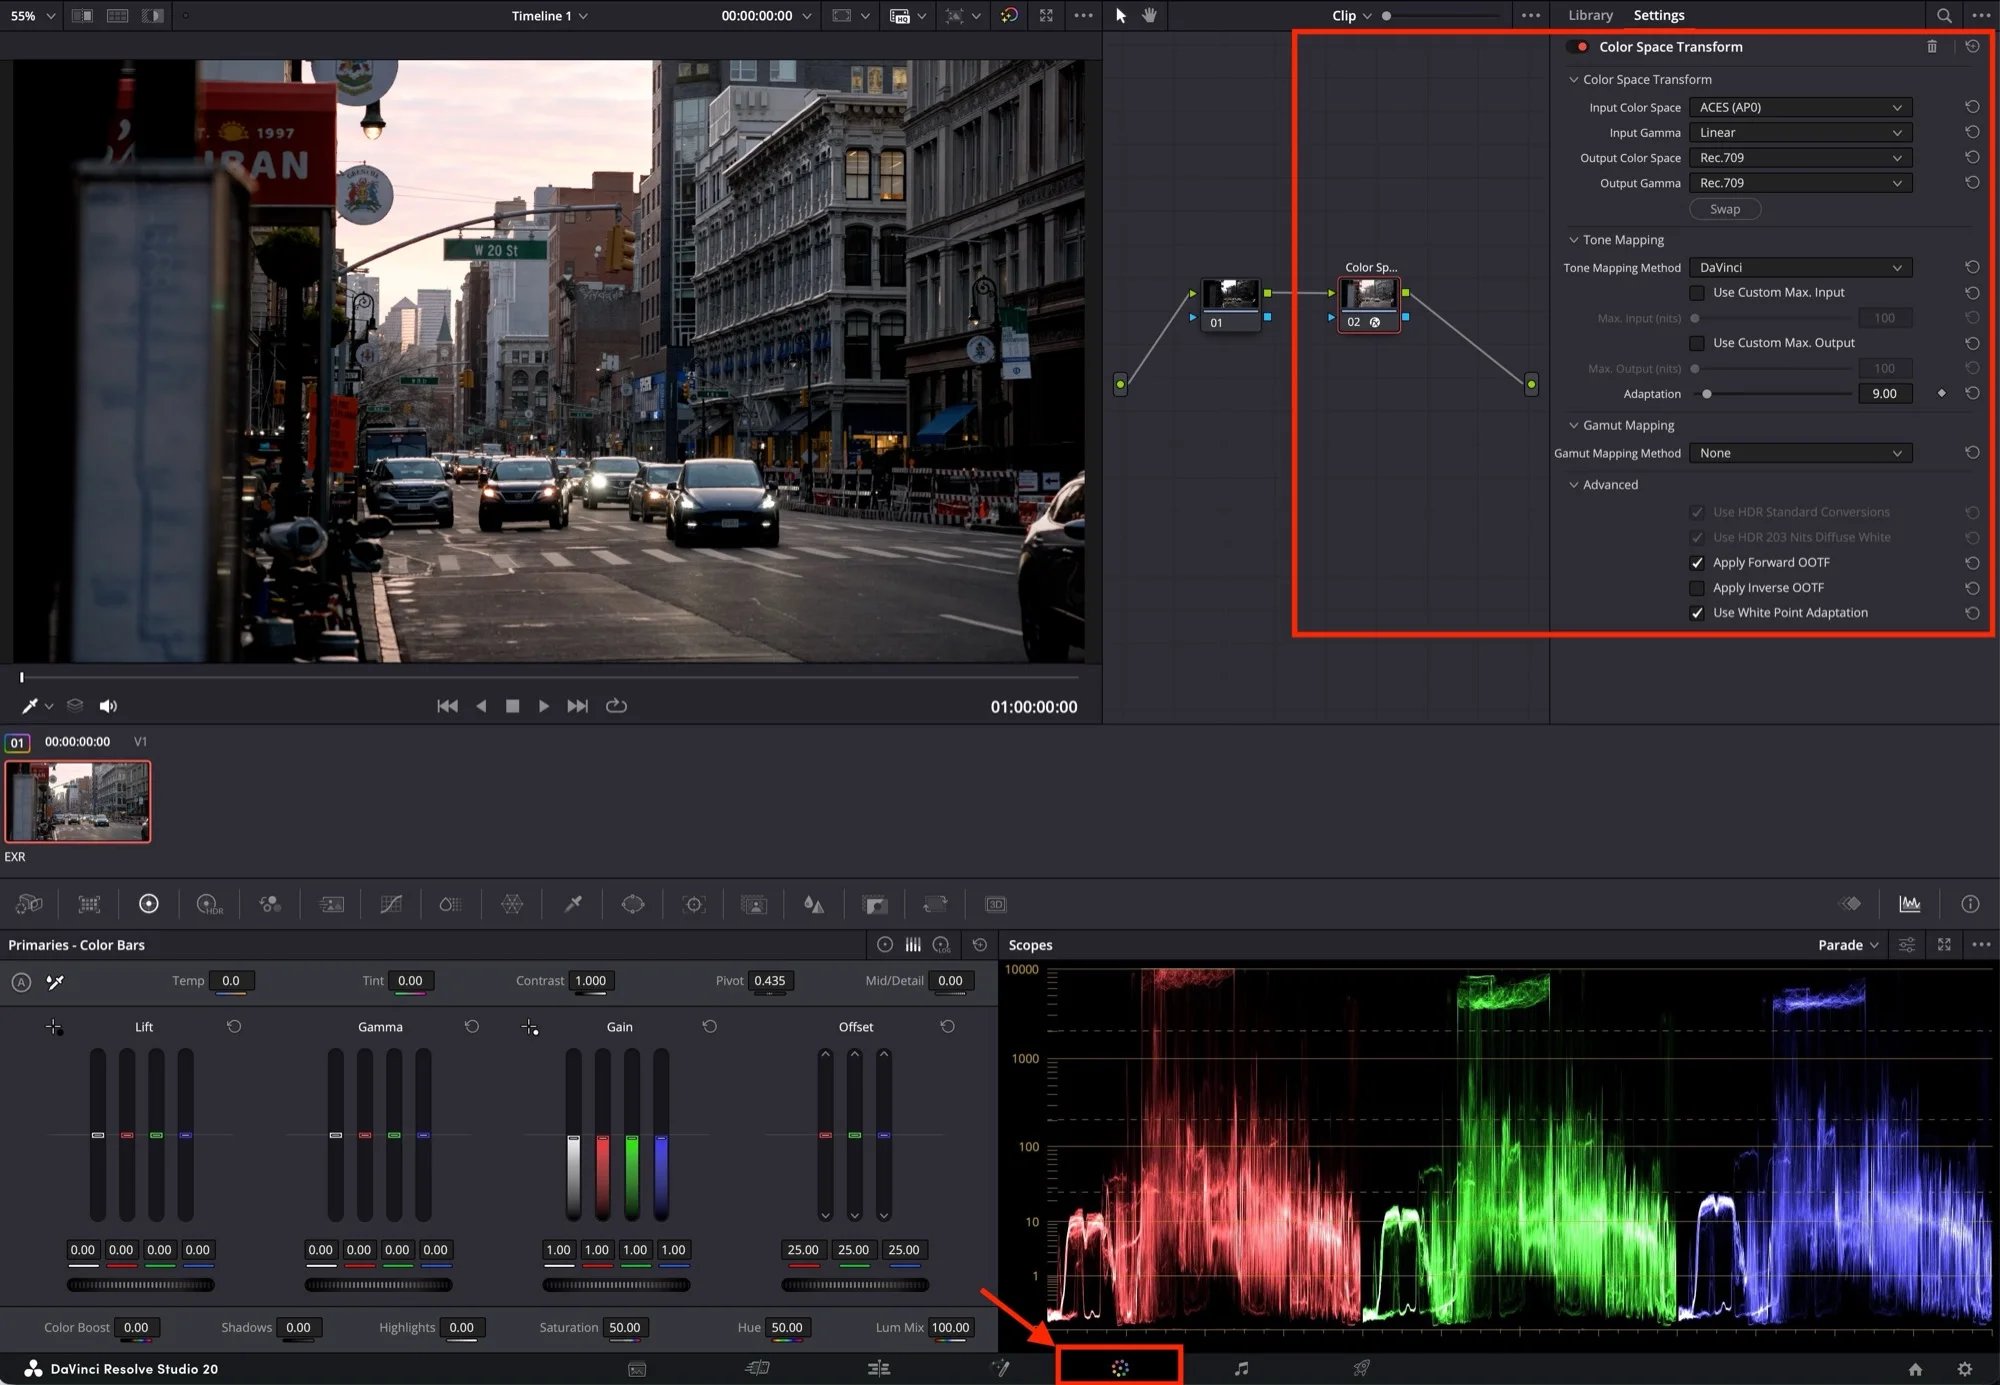
**Option B: Per-shot Color Space Transform node**
We recommend using the **default project setting** (DaVinci YRGB, Rec.709 Gamma 2.4).
1. **Color page → add a node → Effects → Color Space Transform**
2. Input: **ACES (AP0)** / **Linear** → Output: your timeline space (e.g. **Rec.709 / Gamma 2.4**)
### 1. Enable ACES OCIO
Set your Nuke OCIO config to ACES (commonly `aces_1.2` or `aces_1.3` depending on your pipeline).
### 2. Read node
For `{name}_ACES2065-1.exr`, set **colorspace** to **ACES - ACES2065-1** (or the equivalent label in your config).
### 3. Viewer
Set the viewer / monitor transform to your target display (e.g. **Rec.709**).
 **Option B: Per-shot Color Space Transform node**
We recommend using the **default project setting** (DaVinci YRGB, Rec.709 Gamma 2.4).
1. **Color page → add a node → Effects → Color Space Transform**
2. Input: **ACES (AP0)** / **Linear** → Output: your timeline space (e.g. **Rec.709 / Gamma 2.4**)
**Option B: Per-shot Color Space Transform node**
We recommend using the **default project setting** (DaVinci YRGB, Rec.709 Gamma 2.4).
1. **Color page → add a node → Effects → Color Space Transform**
2. Input: **ACES (AP0)** / **Linear** → Output: your timeline space (e.g. **Rec.709 / Gamma 2.4**)